In the early blog(How Dust Affects Circuit Breakers’ Performance?), we explored how something as ordinary as dust can quietly change the way electrical equipment behaves. That earlier look showed how small particles can influence systems in ways that aren’t obvious at first but become serious over time.
As a breaker source factory, we know that dust isn’t just a nuisance—it’s a factor that shapes long-term reliability. Once you understand how easily dust can shape equipment health, it becomes clear that the real challenge isn’t just dealing with the damage—it’s learning how to think about the environment that surrounds your equipment. Dust is part of everyday industrial life, and it tends to appear where you least expect it.
What matters is developing a way of working that treats dust not as an occasional inconvenience but as a constant factor in reliability. When you plan with that mindset, you start to see where vulnerabilities might develop and how small choices today can prevent bigger problems later on.
Choosing the Right Protective Enclosure
Enclosures aren’t all the same. I learned quickly that enclosure ratings are your first line of defense against dust. Choosing the right enclosure can be the difference between equipment that runs reliably for years and circuit breakers that fail in a matter of months.
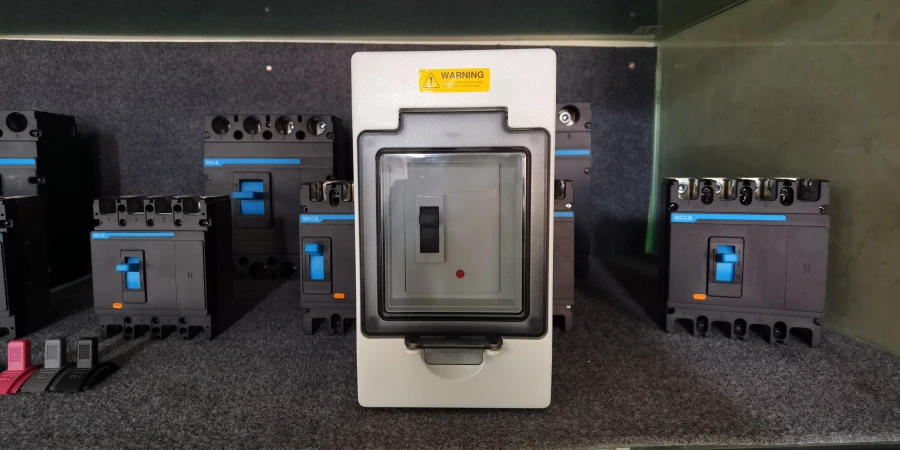
The two main rating systems you’ll see are IP (Ingress Protection) ratings, used internationally, and NEMA ratings common in North America. Both systems tell you how well an enclosure blocks solid particles like dust and liquids like water, but they use different numbering schemes. Understanding the basics helps you match the enclosure to real environmental conditions instead of guessing or overspending.
Understanding IP Ratings
IP rating uses two digits. The first digit (0-6) indicates protection against solid including dust, while the second digit (0-9) covers liquid protection.
For dust-prone environments, you’re mainly concerned with that first digit. An IP54 rating means partial dust protection—some dust can enter, but not enough to interfere with performance. This level works fine for indoor workshops with moderate dust levels or semi-sheltered outdoor areas.
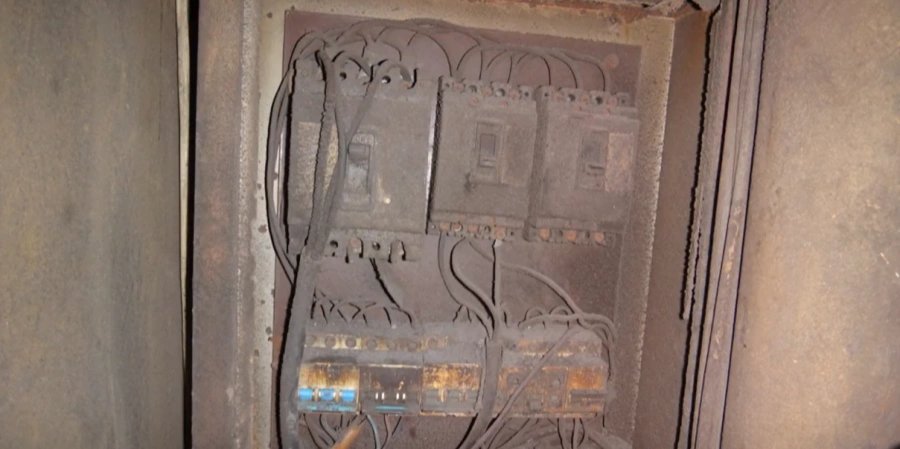
However, if your equipment lives in consistently—manufacturing floors, outdoor installations, or heavy industrial environments—you need at least IP65 protection. That "6" in the first position means completely dust-tight. During testing, manufacturers put IP65 enclosures in a chamber filled with fine talcum powder for 8 hours. At the same time, they draw a partial vacuum inside the enclosure for up to 2 hours to simulate dust trying to get in. If no harmful dust enters, the enclosure passes the test. This is the level of protection your circuit breakers need in consistently dusty environments.
NEMA Ratings Explained
In North America, NEMA enclosure ratings offer similar guidance but use different classifications. NEMA 12 enclosures provide protection against dust, falling dirt, and dripping liquids, making them suitable for indoor industrial areas. NEMA 4 enclosures offer dust-tight and water-tight protection comparable to IP65, making them appropriate for both indoor and outdoor use.
If your facility is in a coastal area or exposed to corrosive atmospheres, NEMA 4X adds corrosion-resistant construction to the dust-tight and water-tight features of NEMA 4. For extreme environments like mining, offshore or areas with frequent washdowns, NEMA 6P provides dust-tight protection plus submersion resistance.
Making the Right Choice
Here’s my practical advice: don’t under-specify your enclosure rating to save a few money upfront. A properly rated enclosure costs more at the beginning but pays for itself many times over by protecting the circuit breakers inside. It’s far cheaper to clean or maintain an enclosure than it is to repair or replace damaged breakers.
| Rating | Dust Protection Level | Best For | Comparable Standard |
|---|---|---|---|
| IP54 / NEMA 12 | Partial—limited dust ingress allowed | Indoor workshops, moderate dust areas | Cross-compatible |
| IP65 / NEMA 4 | Completely dust-tight | Industrial facilities, regular dusty conditions | Cross-compatible |
| IP66 / NEMA 4X | Dust-tight plus enhanced water and corrosion resistance | Harsh outdoor, coastal environments | Cross-compatible |
| IP67–68 / NEMA 6P | Dust-tight plus submersion protection | Mining, offshore, extreme conditions | Cross-compatible |
Think about your real working conditions, not the ideal ones. If your facility looks clean today but your processes create fine particulates, it’s better to assume dust will be an issue. If your location sees seasonal changes, periodic construction, or shifts in production, plan for that too. It’s almost always better to choose a higher level of protection than to discover—months later—that your enclosure wasn’t up to the job.
Essential Prevention Methods
The effective dust prevention isn’t about doing one thing perfectly—it’s about building overlapping layers of protection. The facilities that run smoothly are the ones that think systematically about keeping dust away from circuit breakers before it becomes a problem.
Think of it like protecting your home from weather: you don’t just rely on walls; you use walls, a roof, weatherstripping, and proper drainage working together.
The hierarchy of controls for dust prevention follows a logical sequence: start with smart enclosure placement and design, add proper ventilation, implement filtration systems, and maintain good sealing. Each layer catches what the previous one missed, creating a comprehensive defense that’s far more reliable than any single measure.
Smart Enclosure Placement
Location matters more than people realize. I’ve walked into workshops where circuit breakers were mounted directly adjacent to grinding operations or cutting stations—basically in the dust stream. Positioning enclosures in areas with naturally lower dust concentrations is your first line of defense, and it costs nothing beyond careful planning.
When installing enclosures, leave at least 100mm of space on all sides between the enclosure and any walls, equipment, or other obstacles. This spacing has multiple purposes: it allows air circulation for cooling, provides access for maintenance, and prevents dust from collecting in tight corners where it’s difficult to clean. Height matters too. Ground-level installations collect more dust simply because that’s where dust settles. Even modestly elevating enclosures can greatly reduce dust exposure.
Ventilation Systems That Work
Proper ventilation handles both dust and heat, dealing with two major threats at the same time. The key is strategic intake positioning—place air intakes upwind of dust generation sources whenever possible. If your primary dust comes from a specific process or direction, orient your ventilation to draw air from the opposite side.
Louvered air intakes help deflect larger particles before they reach filters or interior spaces. These angled vents use gravity and airflow patterns to drop heavier dust particles before they enter the system. Combined with proper filter media, louvered intakes significantly reduce the dust burden on your electrical enclosures.
The technical manager in my factory always recommends facilities map their dust sources and prevailing airflow patterns before installing ventilation. It takes just an extra day of planning, but it prevents the common mistake of positioning intakes where they’ll pull in maximum dust.
Filtration and Air Cleaning
High-density foam air filters are the standard in factory environments. These filters catch dust particles in their porous structure and work well when maintained properly. The key word there is "maintained"—a clogged filter blocks airflow and can cause more problems than no filter at al.
For severe dust challenges, Air Cleaning Blower (ACB) units actively extract dust and pressurize enclosures to prevent infiltration. These systems create positive pressure inside the enclosure, so any small gaps or seams push air outward rather than letting dust-laden air in. Filter fans mounted directly on enclosures could also provide a similar active protection approach. especially for cabinets housing sensitive Air Circuit Breakers (ACB) that require clean air for reliable arc quenching.
Replace filter based on both time intervals and visual inspection. In high-dust environments, filters may need changing every 3-6 months. But don’t wait for the scheduled change if you see visible clogging, discoloration, or feel reduced airflow. A $20 filter replacement can prevents a $5,000 breaker failure.
Sealing and Gaskets
Even the best-rated enclosure fails if its gaskets degrade. Quality gaskets rated for your enclosure’s IP classification form the critical seal between the door and frame. During installation, gaskets must be properly compressed—typically 1.5-2mm—to create an effective barrier. Too little compression leaves gaps; too much causes premature gasket failure.
Inspect gaskets at least annually for signs of degradation: cracking, permanent deformation, loss of elasticity, or visible gaps. Environmental factors like UV exposure, temperature cycling, and chemical exposure all accelerate gasket aging. In my experience, gaskets usually need replacement every 5-10 years, though harsh environments may require more frequent changes.
When you replace gaskets, always use materials specified by the enclosure manufacturer. Generic gaskets might fit physically but may not provide the rated protection level. This isn’t an area to improvise or save a few dollars—proper gaskets maintain your enclosure’s protection rating and prevent silent dust infiltration.
| Prevention Layer | Primary Function | Maintenance Frequency | Cost Range |
|---|---|---|---|
| Strategic placement | Reduce initial dust exposure | One-time (installation) | Planning time only |
| Ventilation system | Manage airflow and temperature | Annual inspection | $300–$1,000 installation |
| Filters and ACBs | Active dust capture | 3–12 months replacement | $100–$300 annually |
| Gaskets and seals | Prevent dust infiltration | Annual inspection, 5–10 year replacement | $200–$500 per replacement cycle |
Monitoring and Early Detection
One of the most valuable lessons I’ve learned is that waiting for visible problems costs money. The most efficient facilities catch issues before they become failures. Early detection through systematic monitoring identifies developing problems when they’re still easy and inexpensive to fix rather than waiting for catastrophic breakdowns that shut down production lines.
Modern monitoring techniques have transformed maintenance from reactive firefighting to proactive management. Instead of waiting for a circuit breaker to fail or trip unexpectedly, you can detect elevated temperatures, degraded connections, or accumulating contamination while equipment continues operating normally. This shift saves both money and headaches.
Infrared Thermography Changes Everything
Infrared thermal imaging cameras can detect temperature variations invisible to the naked eye. Hot spots indicate can problems: loose connections, excessive resistance from dust-contaminated contacts, or poor heat dissipation due to dust insulation. The beauty of thermal imaging is that it spots these issues before they cause visible damage or equipment failure.
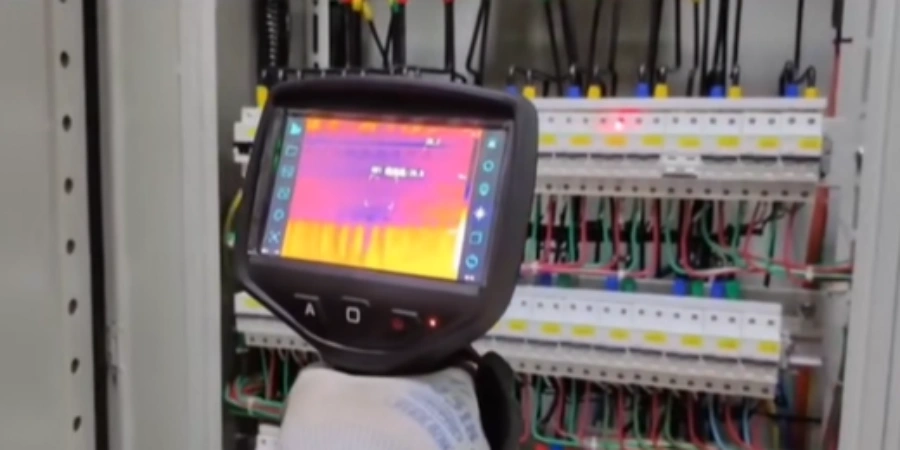
Under the 2023 NFPA 70B requirements, annual infrared inspection is now mandatory for all electrical equipment. Equipment assessed as Condition 3 (poor condition requiring attention) needs inspection every six months. These aren’t recommendations anymore—they’re requirements that carry real consequences for non-compliance including OSHA citations and potential insurance complications.
During thermal imaging inspections, look for temperature differences between similar components. If one circuit breaker runs way hotter than identical breakers under similar loads, something’s wrong. That temperature difference often indicates dust accumulation affecting heat dissipation or degraded connections increasing resistance.
Visual Inspection Protocols
While thermal imaging catches problems you can’t see, systematic visual inspection can find obvious issues before they progress. In high-dust environments, schedule monthly visual inspections to look for dust accumulation, discoloration indicating overheating, visible corrosion, or physical damage to enclosures and gaskets.
Document your findings with photos. Photos create objective records showing dust accumulation progression over time. They’re useful for justifying maintenance budget requests, demonstrating compliance during audits, and training new personnel on what problems look like. It often changes how teams approach maintenance because the issues become visible to everyone instead of being described only in words.
Listen during inspections too. Unusual sounds—buzzing, humming, or crackling—often signal component distress. Dust-contaminated breakers sometimes produce subtle sounds as arcing begins or as mechanical components bind against accumulated particles. Your ears can catch problems before your eyes see them.
Contact Resistance Measurement
Electrical connections degrade over time, especially with dust and corrosion. Measuring contact resistance quantifies this degradation by checking the voltage drop across connections. High resistance indicates corroded contacts or poor connections made worse by dust. Low, stable resistance means healthy connections.
The key is setting baseline measurements during initial commissioning or when equipment is known to be in good condition. Then compare future readings against those baselines. Rising resistance trends provide early warning—you can schedule maintenance when resistance increases 20–30% rather than waiting for it to double or triple.
Insulation Resistance Testing
Megohmmeter testing detects insulation breakdown caused by dust contamination, moisture absorption, or material degradation. These tests apply a DC voltage (typically 500V or 1000V depending on equipment voltage class) and measure leakage current through insulation. High insulation resistance indicates healthy insulation; declining resistance suggests an elevated risk of failure.
Like contact resistance, baseline values matters enormously. Test new or freshly maintained equipment to set expected ranges for your specific installations. Then track how those values change over time. A 50% drop between consecutive tests indicates rapid degradation requiring immediate attention even if absolute values remain above minimum thresholds.
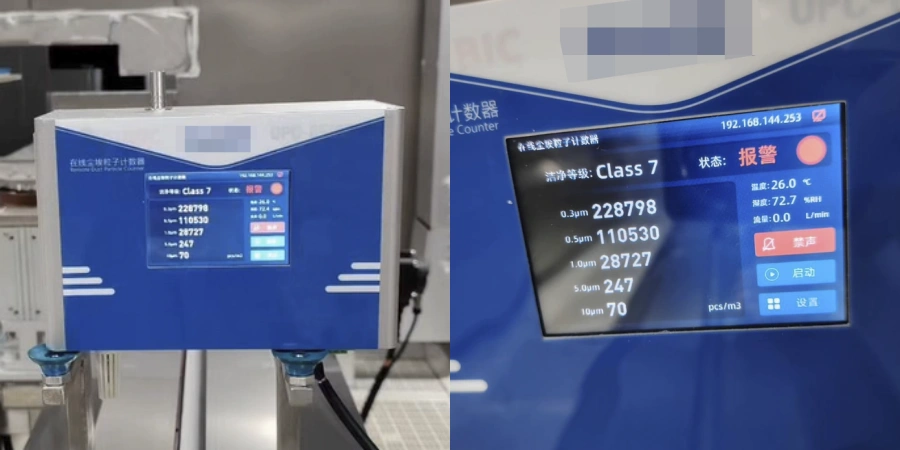
Environmental Monitoring
Real-time dust concentration monitoring with laser particle counters helps facilities quantify their dust challenges . Fixed-position monitors identify dust sources, evaluate control effectiveness, and trigger maintenance when dust exceeds predetermined thresholds. For instance, cleaning could be scheduled whenever dust concentration exceeds a specific level in milligrams per cubic meter.
Personal exposure monitoring serves dual purposes: protecting worker safety during cleaning tasks and identifying areas where dust threatens equipment. Workers cleaning heavily contaminated equipment need respiratory protection, and monitoring data helps determine the required level.
Environmental sensors tracking temperature and humidity alongside dust concentration reveal correlations that inform maintenance scheduling. You might discover that dust becomes problematic specifically during humid summer months or that certain production schedules generate more dust than others. This data-driven approach to monitoring always beats guesswork.
Conclusion
In the end, keeping equipment clean is really about keeping operations stable. When you build habits that prevent dust rather than chase it, you create a workplace that works with you instead of against you. Small, steady choices shape long-term reliability.