When you open an electrical control cabinet, you’ll almost always see a row of metal rails holding breakers, relays, and terminal blocks in place. These rails may look simple, but they are a key part of how modern electrical systems are built, organized, and maintained.
A DIN rail is a standardized metal rail used to mount electrical and automation components inside enclosures. Thanks to international standards, devices from different manufacturers can be installed on the same rail quickly and securely. This makes DIN rails widely used in power distribution, industrial automation, and building management systems.
Although DIN rails are often taken for granted, choosing the right type, material, and installation method can make a big difference in safety, efficiency, and future maintenance. In this guide, I’ll explain what DIN rails are, how they developed, the different types available, and how to select and use them with confidence.
What Are DIN Rails?
Have you ever wondered how all those electrical components stay neatly organized in control panels? That’s where DIN rails come in.
DIN rails—“DIN” stands for Deutsches Institut für Normung, the German Institute for Standardization—make it easy to mount devices like circuit breakers, relays, and terminal blocks in a neat, consistent way—no screws or complicated tools required. DIN rails help save space, reduce installation time, and allow for flexible system expansion or maintenance.
Understanding DIN Rails
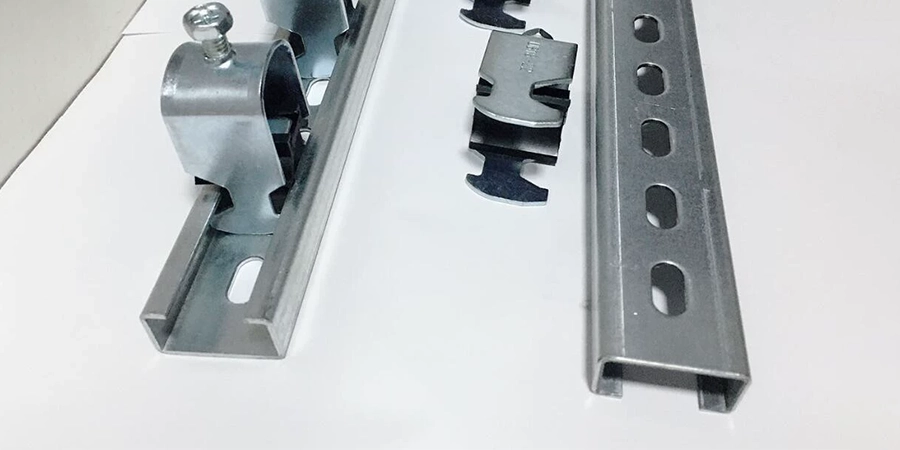
For those who might not be familiar, a DIN rail is typically a long, narrow strip of metal with a specific cross-sectional shape—usually a top-hat profile, about 35 mm wide. It’s mounted vertically or horizontally inside electrical enclosures or control panels. Devices like circuit breakers, contactors, and terminal blocks have clips or mounts that snap onto the rail, holding them securely in place.
The beauty of DIN rails lies in their standardization. Since they follow international standards like EN 60715, any device designed for DIN rail mounting from any manufacturer should fit onto the same rail. This means you can mix and match components from different brands without worrying about compatibility issues. That’s a huge time-saver and cost reducer for electricians and engineers.
Moreover, DIN rails make installations cleaner and more organized. Instead of having components screwed directly onto the panel, which can be messy and time-consuming, you can just snap them onto the rail. This also makes it easier to add or remove devices later on, which is important for maintenance and upgrades.
I remember a time when the electrician at my company was working on a project where we had to retrofit an old control panel. Without DIN rails, it was a nightmare—everything was hardwired and screwed in place, turning even the smallest modification into a major task. But once we started using DIN rails, the difference was night and day. We could quickly swap out components, add new ones, and keep everything tidy.
Benefits of DIN Rails
In large industrial settings, where control panels can house hundreds of devices, DIN rails allow for a modular approach. You can plan your panel layout more efficiently, knowing that each device will take up a standard amount of space—typically in 18 mm modules. This modularity not only saves space but also makes troubleshooting easier, as you can quickly locate and access any component.
Another advantage is safety. With components securely mounted on DIN rails, there’s less risk of them coming loose or causing short circuits. Plus, the rails themselves can be grounded, providing an additional layer of protection.
To summarize their importance, here’s a quick overview:
| Benefit | Description |
|---|---|
| Standardization | Ensures compatibility across brands, reducing integration issues. |
| Organization | Keeps components neatly arranged, improving panel aesthetics and access. |
| Ease of Use | Simplifies installation and maintenance with snap-on mounting. |
| Safety | Reduces risks of loose components and allows grounding for added protection. |
| Cost-Effectiveness | Lowers costs through interchangeable parts and reduced custom solutions. |
In summary, DIN rails are not just a convenience; they are a necessity in modern electrical engineering, providing structure, safety, and efficiency.
How Did DIN Rails Evolve Over Time?
Every technology has its roots, and DIN rails are no exception. But how did they go from a simple idea to a global standard?
DIN rails are originated in 1920s Germany with the Rheinisch-Westfälisches Elektrizitätswerk (RWE), a major power company. At that time, they used porcelain for mounting electrical components. By the 1950s, these were replaced with stronger metal designs. As international standards from IEC and ISO came into play, DIN rails gained worldwide use—leading to today’s EN 60715 standard.

The Early Days
The story of DIN rails begins in 1928 in Germany, with the energy company RWE seeking to standardize the way electrical components were mounted. At that time, porcelain was commonly used, but it had its limitations—it was brittle and not very durable. As electrical systems became more complex, there was a need for a more solid solution.
Then, in the 1950s, the design shifted to metal rails, specifically cold-rolled steel, which offered greater strength and longevity. To protect against corrosion, these steel rails were often zinc-plated or chromated. This marked a significant improvement, as metal rails could withstand the harsh conditions often found in industrial environments.
Global Standardization
The real turning point was standardization. After World War II, there was a push to create international standards to support trade and cooperation across countries. Organizations like the International Electrotechnical Commission (IEC) and the International Organization for Standardization (ISO) played key roles in developing standards for DIN rails. These standards were eventually formalized in documents like EN 60715. As a result, DIN rails and the devices that use them became compatible worldwide, no matter which factory made them.
I remember once in my company, the workers were setting up a new control system. We had components from different brands—some from Japan, others from Germany. Normally, mixing brands would cause mounting issues. But thanks to the DIN rail standard, everything clicked into place without any problems. It saved us a lot of time during installation and made future maintenance much simpler.
Continued Refinements
Over the years, DIN rails have been improved in many ways. New profiles like the C-section and G-section were introduced for specific uses, and smaller rails were made for tight spaces. But the main idea stayed the same: providing a standard, reliable way to mount electrical components.
To give you a better sense of this evolution, here are some key milestones:
| Year/Period | Milestone |
|---|---|
| 1928 | RWE introduces porcelain-based mounting system. |
| 1950s | Shift to metal rails with zinc or chrome plating. |
| 1960s-1970s | International standards set by IEC and ISO. |
| 1980s | C-section and G-section profiles introduced |
| 1990s-Present | Miniature rails and new material developed |
This timeline shows how DIN rails have kept evolving to meet the electrical industry’s changing needs.
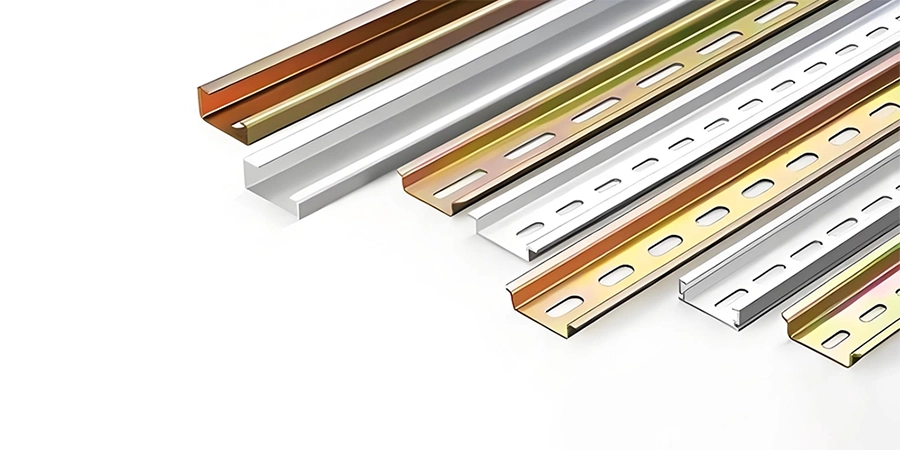
What Are the Different Types of DIN Rails?
Just like there are different types of screws for different jobs, DIN rails come in various shapes and sizes to suit different needs.
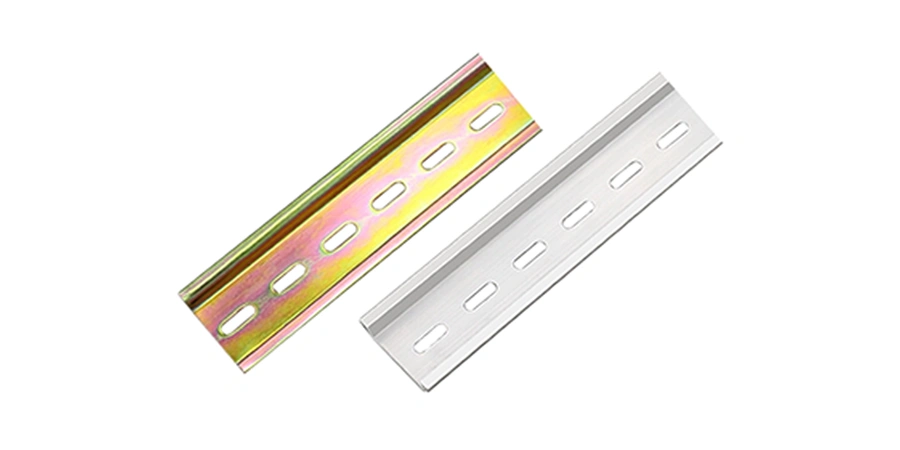
The most common type is the Top Hat rail (TH35/TS35), which is 35 mm wide and used for standard applications like circuit breakers. There are also C-section and G-section rails for heavier loads or specific mounting requirements, and miniature rails that are 15 mm wide for compact installations.

Exploring the Types
Let’s start with the Top Hat rail, also known as TH35 or TS35. This is the standard bearer of DIN rails, literally. It’s called “top hat” because of its shape—it has a flat top with flanges on either side, resembling a hat. The standard width is 35 mm, and it’s typically 7.5 mm high, though there are deeper versions at 15 mm for certain applications. These are used for mounting a wide range of devices, from small terminal blocks to larger circuit breakers, as long as they are designed with the appropriate clips.
Next, there are C-section rails. These have a different profile, with a recessed center, which allows for mounting devices that need to be flush with the panel or have specific mounting requirements. They’re often used in applications where space is at a premium or where the devices need to be mounted in a particular way.
Then, there’s the G-section rail, which is designed for heavier loads. It has a wider base and can support more weight, making it suitable for industrial environments where larger or heavier components need to be mounted.
Lastly, miniature rails are exactly what they sound like—smaller versions, typically 15 mm wide and 5.5 mm high. These are perfect for applications where space is limited, such as in telecommunications equipment or small control boxes. They can hold lighter components like signal conditioners or small relays.
Choosing the Right Type
To help visualize this, here’s a table comparing the different types:
| Type | Width (mm) | Height (mm) | Typical Use |
|---|---|---|---|
| Top Hat (TH35) | 35 | 7.5 or 15 | Standard applications, circuit breakers |
| C-Section | Varies | Varies | Specialized mounting, flush installations |
| G-Section | Varies | Varies | Heavy-duty applications |
| Miniature | 15 | 5.5 | Space-constrained environments |
Choosing the right type depends on the specific requirements of your project. For most standard electrical panels, the Top Hat rail is the go-to choice. But if you’re dealing with heavier components or need a different mounting configuration, you might consider C or G sections. And for tight spaces, miniature rails are your friend.
In my experience, I’ve seen all types in use. For example, in a large factory setting, we used G-section rails for the main power distribution panels because they had to support heavy-duty breakers. But in the control rooms, where there were PLCs and smaller devices, Top Hat rails were enough. And for a custom automation project I worked on, we used miniature rails to fit everything into a small enclosure.
What Are Din Rails Made of?
The material used in a DIN rail affects how well it works and how long it lasts. But what are these materials, and how are the rails made to such precise standards?
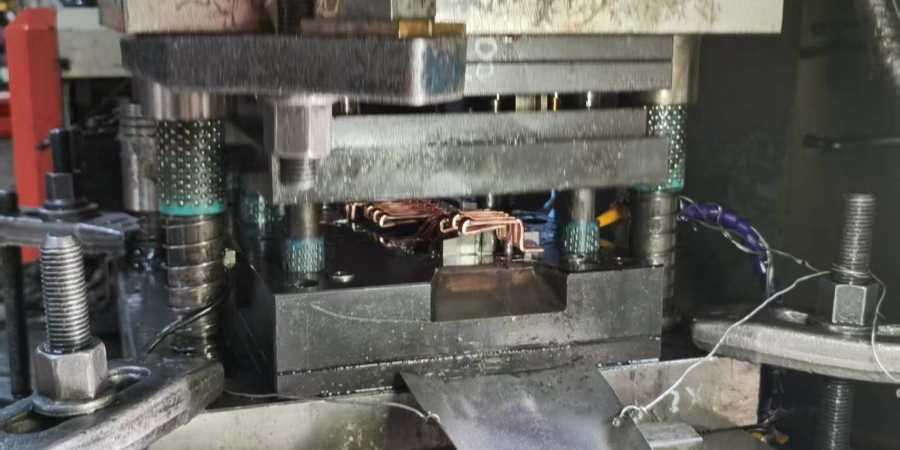
DIN rails are usually made from cold-rolled steel coated with zinc to prevent rust. Some are made from aluminum, which is lighter and more flexible. They are made using precise methods like stamping and extrusion. To keep quality consistent, manufacturers follow standards such as EN ISO 9001:2000.
Material Choices
When it comes to materials, the most common choice is cold-rolled steel. This is a type of steel that has been processed at room temperature, which gives it a smooth finish and precise dimensions. To protect against rust and corrosion, these steel rails are often zinc-plated, which adds a layer of zinc that sacrifices itself to protect the steel. Some rails also use chromated finishes for additional durability.
For situations where weight is a concern, such as in transportation or aerospace, aluminum DIN rails are used. Aluminum is lighter than steel and also resistant to corrosion, making it a good alternative. However, it might not be as strong as steel, so you need to consider how much weight it can hold.
Manufacturing Process
Manufacturing DIN rails requires high precision because they need to fit standard devices accurately. The process typically involves stamping, where a flat sheet of metal is cut and shaped into the desired profile, or extrusion, where the metal is pushed through a die to form the shape. These processes are carried out under strict quality control, often certified by standards like EN ISO 9001:2000, which ensures that the rails meet the required tolerances—usually within ±0.2 mm.
Additionally, the rails must be able to bear certain loads. For static applications, where the components don’t move much, a standard Top Hat rail can support up to 50 kg per meter. For dynamic loads, where there might be vibrations or movement, the capacity is lower, around 30 kg per meter, as per EN 60715 standards.
In my work, I’ve learned how important it is to choose the right material. For example, in coastal areas with lots of humidity and salty air, we use zinc-plated steel rails to stop rust. But in dry inland places, regular steel rails usually work fine. Also, when we worked on a mobile generator, we picked aluminum rails to keep the weight down without losing performance.
Material Comparison
Here’s a quick look at common materials used for DIN rails:
| Material | Advantages | Disadvantages |
|---|---|---|
| Cold-Rolled Steel | Strong, durable, cost-effective | Can cost if not coated |
| Zinc-Plated Steel | Resists rust | Slightly higher cost |
| Aluminum | Lightweight, resists rust | Not as strong as steel |
Choosing the right material depends on where and how the Din rails will be used. For most indoor set-ups, zinc-plated steel is a safe choice, while aluminum is better for outdoor or mobile use where weight is a factor.
Knowing the materials and how DIN rails are made helps explain why they’re so reliable and why they’ve become the industry standard.
How to Install DIN Rails?
Installing electrical components can feel like assembling a puzzle, especially when parts come from different suppliers. How do you make sure DIN rails are installed right and everything fits perfectly?
DIN rails are mounted in enclosures using screws or clips, either vertically or horizontally. Standards like EN 60715 set the rules for size and load capacity, which define dimensions and load capacities, allowing devices from brands like Siemens or Schneider Electric to fit seamlessly.
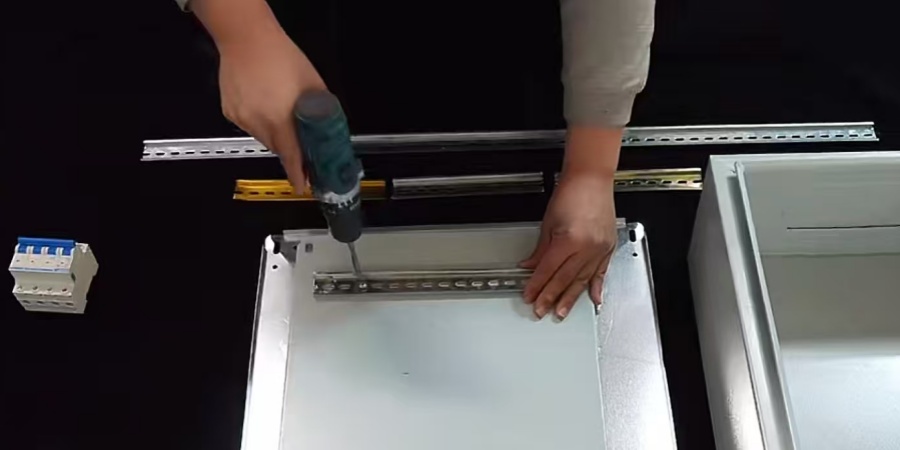
Installation Basics
Mounting a DIN rail is simple. You attach it to the backplate of an enclosure using screws through pre-drilled holes or snap-on brackets for faster work. You can position it vertically for tall panels or horizontally for wider ones, depending on your layout. Just make sure the rail is level and tightly fixed to hold the components’ weight.
Devices like circuit breakers or terminal blocks come with clips that snap onto the rail. You hook the clip onto the top flange, then press down until it locks into place. No tools needed, which makes swapping parts quick.
Ensuring Compatibility
The EN 60715 standard makes sure rails and devices have matching sizes. Most devices come in 18 mm wide modules, so a small breaker fits perfectly on a 35 mm Top Hat rail. This means you can mix and match parts from different makers without trouble.
But be careful: different rail types like C-section or G-section are for different uses, so match the rail to the device. Also, watch the load capacity. A standard Top Hat rail can hold up to 50 kg per meter if things stay still, but only about 30 kg per meter if there’s vibration. Overloading can cause the rail to bend.
The environment matters too. In humid or salty places like coastal plants, use zinc-plated or stainless steel rails to stop rust. Here’s a quick guide to installation considerations:
| Factor | Consideration |
|---|---|
| Mounting Method | Screws or snap-on brackets for secure fit |
| Rail Type | Match to device requirements (e.g., Top Hat) |
| Load Capacity | Check static (50 kg/m) vs. dynamic (30 kg/m) |
| Environment | Use corrosion-resistant materials in harsh conditions |
Tips for Success
To avoid problems, always check the rail’s load limit and the environment it will be in. Plan your setup to spread the weight evenly, and make sure all parts follow the same standards. Doing this saves time and prevents headaches later.
What Does the Future Hold for DIN Rail Technology?
Technology keeps moving forward, and even something as simple as a DIN rail isn’t standing still. So, what might come next for this key part of modern electrical systems?
Material Innovations
Today, most DIN rails are made from steel or aluminum. But newer materials, like lightweight composites or even carbon fiber, could offer better strength-to-weight ratios and resist corrosion. That would be perfect for things like aerospace or mobile systems. I can imagine a time when a composite rail helps cut weight in an electric vehicle’s control system and improves energy efficiency.
IoT and Smart Rails
DIN rails could also get smarter. Think about rails with built-in sensors that track temperature, vibration, or device health. The data could go straight to a dashboard and warn you before something fails. I saw a demo of this at a trade show—one rail had sensors sending live data to a screen. It looked like a huge step forward for predictive maintenance, especially in smart grids.
AI-Driven Optimization
AI could take DIN rails to the next level by optimizing panel layouts. Imagine software that analyzes heat dissipation, electrical interference, and access needs to arrange components on the rail automatically. This would save hours of planning in complex setups. My coworker worked on panels where he spent days tweaking layouts; AI could have cut that time significantly if this becomes reality.
Sustainability and Scalability
As industries focus on sustainability, DIN rails might be made from recycled materials or designed for easier recycling. This fits well with modern manufacturing goals. And as smart cities and IoT networks grow, DIN rails will support all kinds of sensors and controllers needed for these systems, ensuring they remain scalable and adaptable.
Looking Ahead
The DIN rail’s future is about keeping its strengths—standardization and simplicity—while adding new tech where it counts. Whether through smarter materials or built-in intelligence, DIN rails will stay central to how we build and maintain electrical systems.
Conclusion
DIN rails may seem small and simple, but they play a big role in keeping electrical systems safe, neat, and easy to manage. Knowing the different types, materials, and how to install them can save time and make your job easier. As technology keeps moving forward, DIN rails will continue to improve and stay important in both old and new electrical setups.
Populate Your Panels with Quality
A DIN rail is only as good as the components mounted on it. Ensure your installation is safe and reliable with our industrial-grade circuit protection.